- Continue Shopping
- Your Cart is Empty
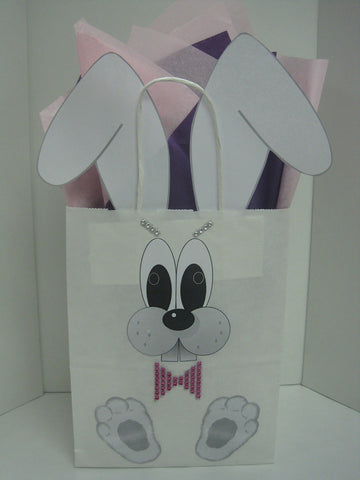
Easter Bunny Bag – By Donna @ Edmonton Store

Here’s what you will need
- 1 White Shop Bag 8x10
- Template of Bunny face, ears & paws
- 2 Small Strips Faux Jewel Metallic Ribbon - Silver
- 1 Small Piece Faux Jewel Metallic Ribbon - Fuchsia
- 2 Sheets Pink Tissue; 1 Sheet Purple Tissue
- White Tulle
- Stretch Puff Loop – Light Pink
- Scissors, Double Sided Tape
Easter Treats – By Donna @ Edmonton

Here’s what you will need
- 1 Clear lid/bottom Confection Box – 3 ½” x 3 ½” x1”
- 1 PP Bag - 4 0z
- 1 Handful of Shred – Fuchsia & Lime Green
- Grosgrain Ribbon – Pink & Lime Green
- 2 Small White Tags
- Scissors
- Black Felt
We love Our Peeps Idea #2 – By Julie @ Burnaby Store

What you will need
- 1 – 4x8/5/8 clear cardboard bottom bag
- Yellow and lime green shred
- 1” yellow and lime green organza ribbon
- Tag
- Pen
We Love Our Peeps Idea #1 – By Julie @ Burnaby Store

What you will need
- 3- ½ x 15 clear basket bag
- ½” organza ribbon
- Tag
- Easter Peeps
- Pen
Easter Egg Centrepiece– By Julie @ Burnaby Store

What you will need
- 1 Roll 6”x 100” table runner
- Baking Cups
- Yellow and Lime Green Shred
- Easter Eggs
Jelly Bean Cone Bags – By Erin @ Calgary Store

Here’s what you will need
- Jelly Beans
- One inch Satin Ribbon
- Cone bags (6 Inch by 12 Inch)
- Scissors to cut the ribbon
Sweet Tweets Easter Goodie Bags – By Erin @ Calgary Store

What you will need
- A colored SOS Bag
- Mini Clothes pins
- A Fun Tag (A cartoon character in color - You can print this out and cut it out from the internet like TWEETY BIRD above)
- Your favorite snacks to drop in the bag, Example, Dried fruit, Granola pieces, Easter Eggs, Kinder Eggs, Oranges, cookies
Take your pick Easter goodies– By Erin @ Calgary Store

What you need
- Scissors
- Easter Eggs
- Jelly Beans
- 4 – 2x2x2 Clear boxes
- One Inch Yellow Satin Ribbon
View full article →
Easter Sundaes – By Gina @ Coquitlam Head Office

Here’s what you will need
- 1 Sheet of 20x30 Light Pink Tissue
- 1” Yellow Satin Ribbon
- 1 Yellow Paper Eskimo Powder Straw
- Scissors
- Parfait Glass
- Wrapped Easter Candy
Easter Bunny – By Yvonne @ Edmonton Store


Here’s what you will need
- Non woven white wrap
- White Tulle 6” wide
- Silver twist ties
- 1 sheet plain white paper
- 1 sheet each, pink, green and tapestry flowers tissue
- Lime Green shred
- Faux Jewel ribbon ,pink and black
- ½ “ white organza ribbon
- 12” square cardboard for base
- Glue stick
- Glue gun
- Scissors
- Tape
Here’s what you’ll do
Cover cardboard with green tissue paper, taping on the bottom. Cut 4 strips of non woven white 7 ½ ” wide and 19 ½” long for the body. Cut 4 strips of non woven white 6” wide and 19 ½” long for the head. Cut 3 strips 6” wide white tulle 19 ½” long for the body. Cut 3 strips 6” wide white tulle 19 ½” long for the head. Cut 3 strips 6” wide white tulle 19 ½” long for the tail.
Draw some bunny ears on white paper, making the left ear longer, as that will have a fold on the top. Add some extra length at the base so you can tuck them into the space between the head and body.
Cut out the paper ears and glue pink tissue to the center .
Draw one bunny foot on the paper and cut out 2. with your paper folded in half to give you a left and a right foot. Cut out some flowers from the tapestry tissue paper and glue these onto the corners of the green base.
For the head and body, alternate the non woven and tulle layers The tail uses only tulle, so will have 3 pieces.
Fold your layers into an accordion shape along the short edge, giving you a nice full fan. Tie the center with a twist tie.
Snip about an inch into the edges, through all the layers on both the head and the body., about ¼ “ apart
Fluff the layers of the fan apart, the tulle will give the fabric a little more body.
Place the three pieces together and hot glue the tail to the body, and the head to the other side. Fold the sides of the ears in a little to help make the ears stand up and glue the base into the rabbit head and body. Fold over the top of the left ear.
Tie a bow with the organza ribbon in front of the ears.
Cut two eyes from the black faux jewel ribbon, nose from the pink .Glue into position on the face. Hot glue the feet to the base of the body. Add small pieces of shred and hot glue into position. All he needs now is a carrot!


