- Continue Shopping
- Your Cart is Empty
Here comes the BRIDE EVENT
Thank you for attending our Here Comes the Bride event demonstration.
Remember to check in with our stores often as we are always adding many new products, new colors, and new creative wedding ideas to our web site, stores and social media.
Instructions for the items you have seen today can be printed and /or downloaded from the Creative Packaging blog and website.
Website:
http://www.creativepackaging.ca
Blog:
http://www.creativepackaging.ca/blogs/creative‐crafts
Social Media Links:
Facebook Page:
https://www.facebook.com/creativepackaging
Twitter:
https://twitter.com/creative_pkg
Instagram:
https://instagram.com/creativepackaging
Pinterest:
https://www.pinterest.com/creativepkg/
YouTube:
https://www.youtube.com/user/creativepkg
To make an appointment for a FREE personal Creative consultation please contact:
Edmonton Store: Glenda, edmontonstore@creativepackaging.ca 780-414-0463 / 101-10520-178 st, Edmonton, AB
Burnaby Store: Julie, Jlind@creativepackaging.ca 604-444-3552/ 7964 Winston st, Burnaby, BC.
Calgary Store: Erin, emaclachlan@creativepackaging.ca 403-255-2034/ 6105 Centre st, Calgary , AB
DIY Large cupcake
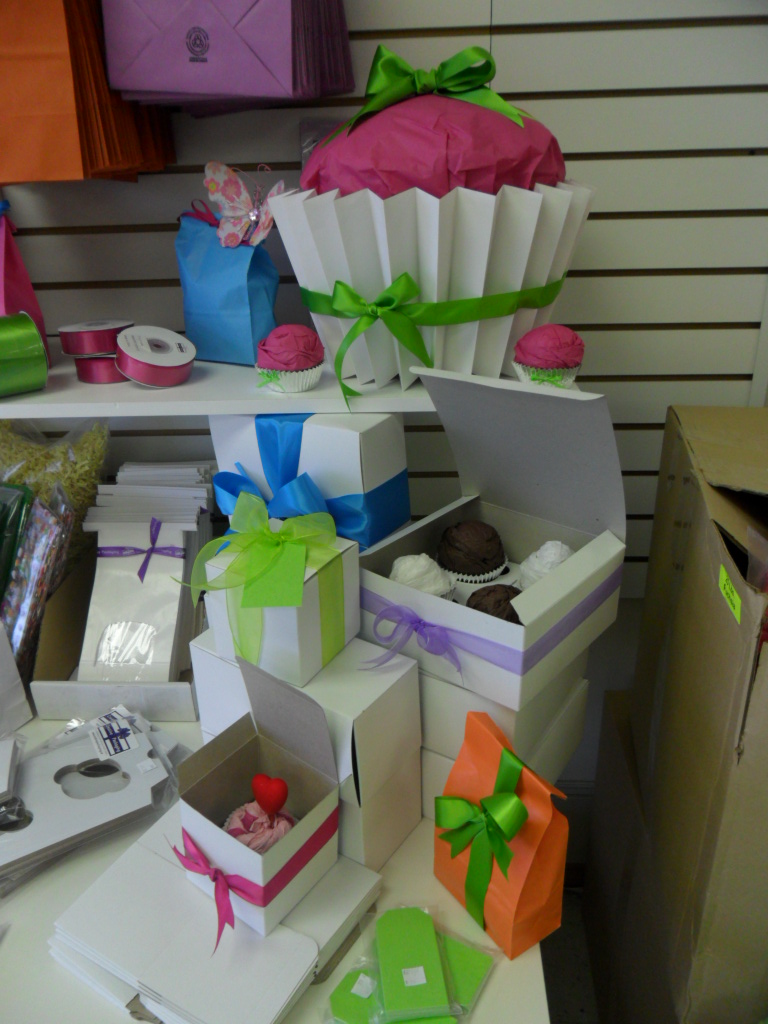
- Cut out two circles. One will be the base. The second one should be about 1 to 2 inches larger in diameter and will be used as the top of the shape. If you think of the shape a cupcake liner would make, you have a section from a cone with a larger circle at the top and the smaller at the bottom.
- Then cut out a whole bunch of strips of cardboard. Anything wider than 1 inch would probably be a pain to work with, so don’t go larger than that. The height of the strip will determine how high your cup will be. We used pieces that were around 5 inches long.
- The strips will be the sides that connect the two round pieces together. This seemed easier when a glob of hot glue was placed on the smaller circle’s edge and then a few strips are placed along the edge at an angle. Remember it will have to go from a smaller diameter to a larger one but don’t be too concerned about getting the angle exact.
- Once the edge of the small circle is covered, take the larger circle and place it inside of the strips. Fiddle around with it to make sure it is fairly center and level in relation to the smaller circle it is suspended above.
- Glue each strip to the second circle. That is your basic shape and will help keep everything together.
- For the outside, use white wrapping paper that will measure out to be about twice the diameter of the larger circle (ex: if the outside rim measures 10 inches all the way around you want to use about 20 inches wrapping paper). It is always a good thing to add a few extra inches just in case.
- Our cupcake liner was made by taking the piece of wrapping paper and folding it three times (along the dotted lines in the little diagram below). This gave an inch of extra paper above the inside cardboard base.
- Take the narrow piece of wrapping paper and fold like a fan. The smaller the distance between the folds the more you will make and the smaller the creases will be on your giant cupcake liner. The larger the distance the less folds but the larger the creases will be.
- When the whole piece of paper is folded open it up and make a circle. Take the cardboard base and make sure it fits inside, not too lose but you also don’t want it too tight because that will just make it more difficult for you. Trim and glue or tape the two ends of the fan after you have found the fit.
- Place the cardboard base inside the wrapping paper. Make sure the creases are evenly spaced (they won’t just do this on their own unfortunately). Then start gluing the paper to the cardboard so it won’t fall apart if you need to move it.
- The bow on the front of our cupcake does not go all the way around. If you try you’ll notice the shape will force it to an angle. If you have a solution for this other than ours go for it. We simply started in the middle of our cupcake and worked back until the angle of the ribbon was too drastic then made a nice cut. At this point it was far enough back that you can’t tell. You will need to do this twice for each side of the knot.
- The frosting topping was made by using scrap/left over/damaged pieces of wrap film and tissue and then wrapped it with a piece of wrap film. The shape was sculpted at this step with tape so that it had a more domed look. Squish it and pinch it, whatever you can to make it into the shape you think it should be.
- Then cover that shape with the colour you want the icing to be. **Keep checking to make sure this piece fits into the cupcake liner you just built for yourself. If it is too small you can twist some similar coloured tissue to place around the bottom but you can’t easily fix it if it is too large.
- Glue both pieces together and place a cute bow on top.
JUST WRAP IT....AMAZING CHICKEN RUB
This week is "Just Wrap It" week where we're excited to bring you a taste of the sorts of recipes you'll find in Just Wrap It - D.I.Y. gift mixes from your kitchen. We'll give you directions on how to package the gift mix to give away for the holidays. You'll be giving the gift of a mix from your very own kitchen! So feel free to mix it up and add ingredients you like! All of the packaging you'll need for these gifts can be found at Creative Packaging!Here's the recipe for Amazing Chicken Rub!
You'll need: A small plastic clear jar, ribbon, a tag, 1 tbsp Mrs. Dash seasoning, 1/8 tbsp salt, 1 tsp sugar, 1 tsp garlic powder (you can do this with any combination of seasonings/rub mix you like)
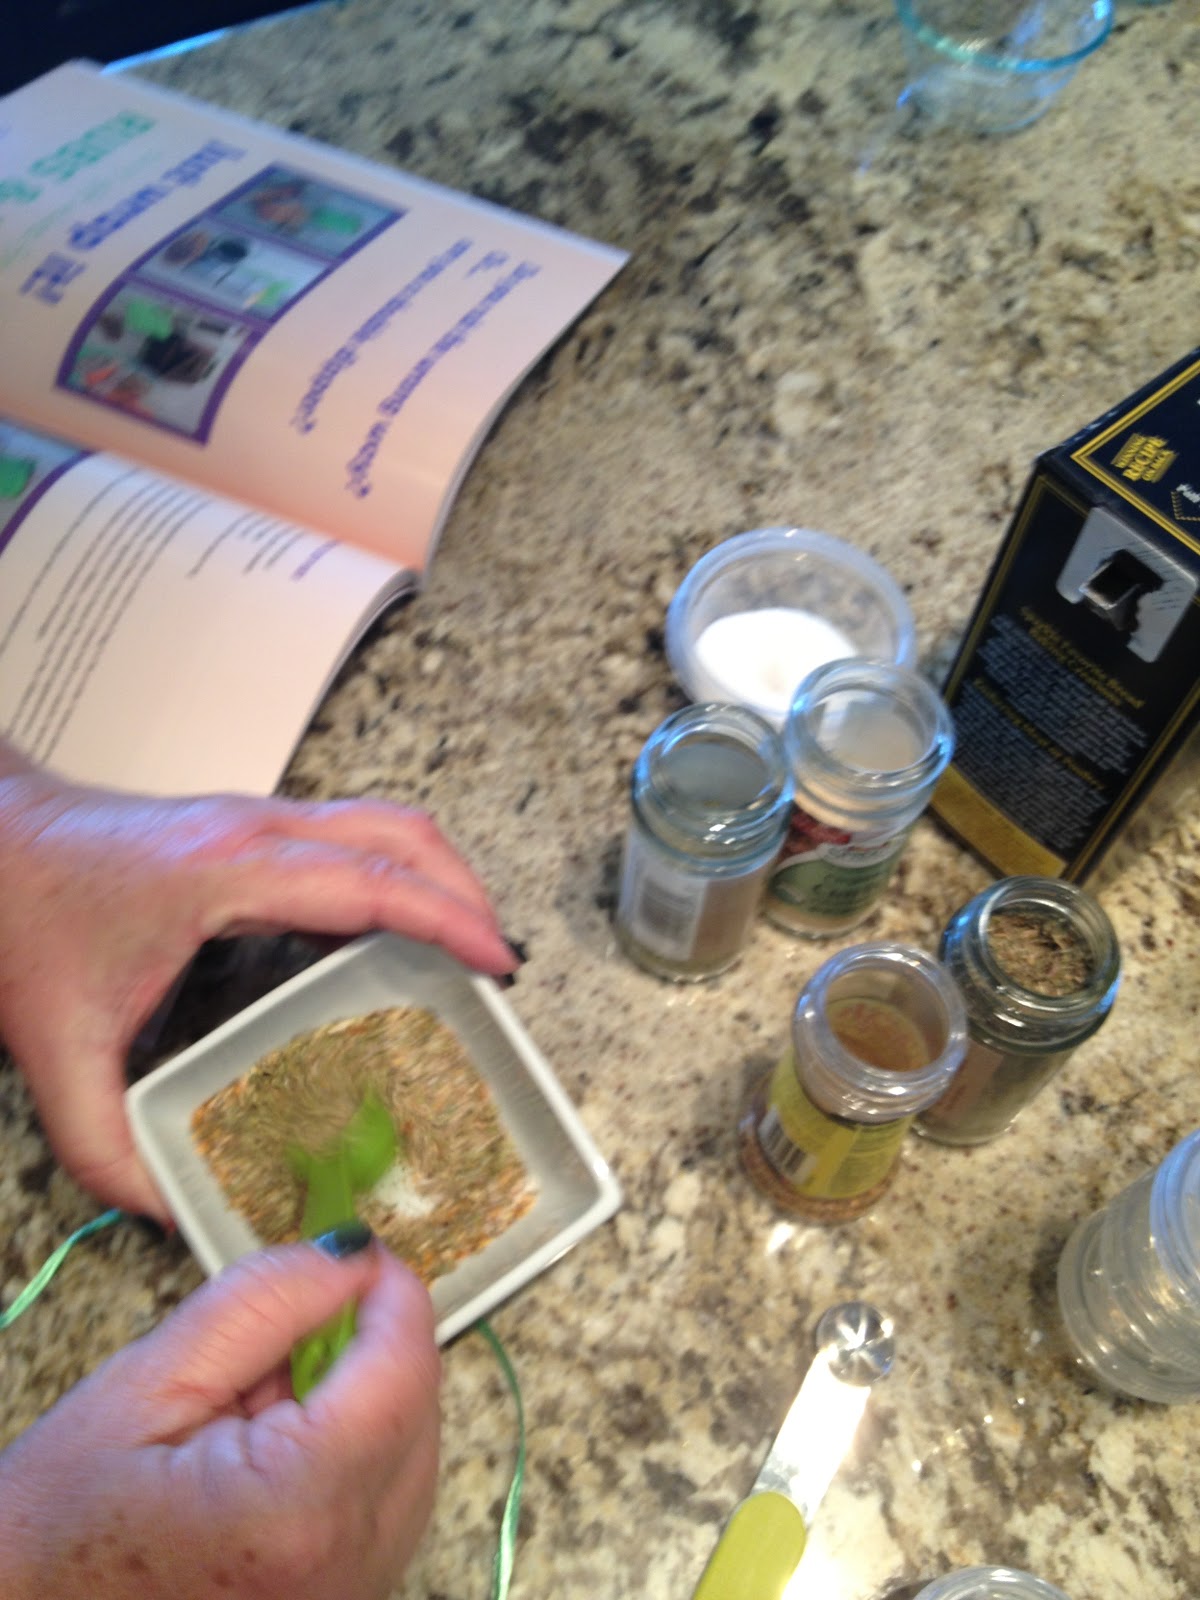
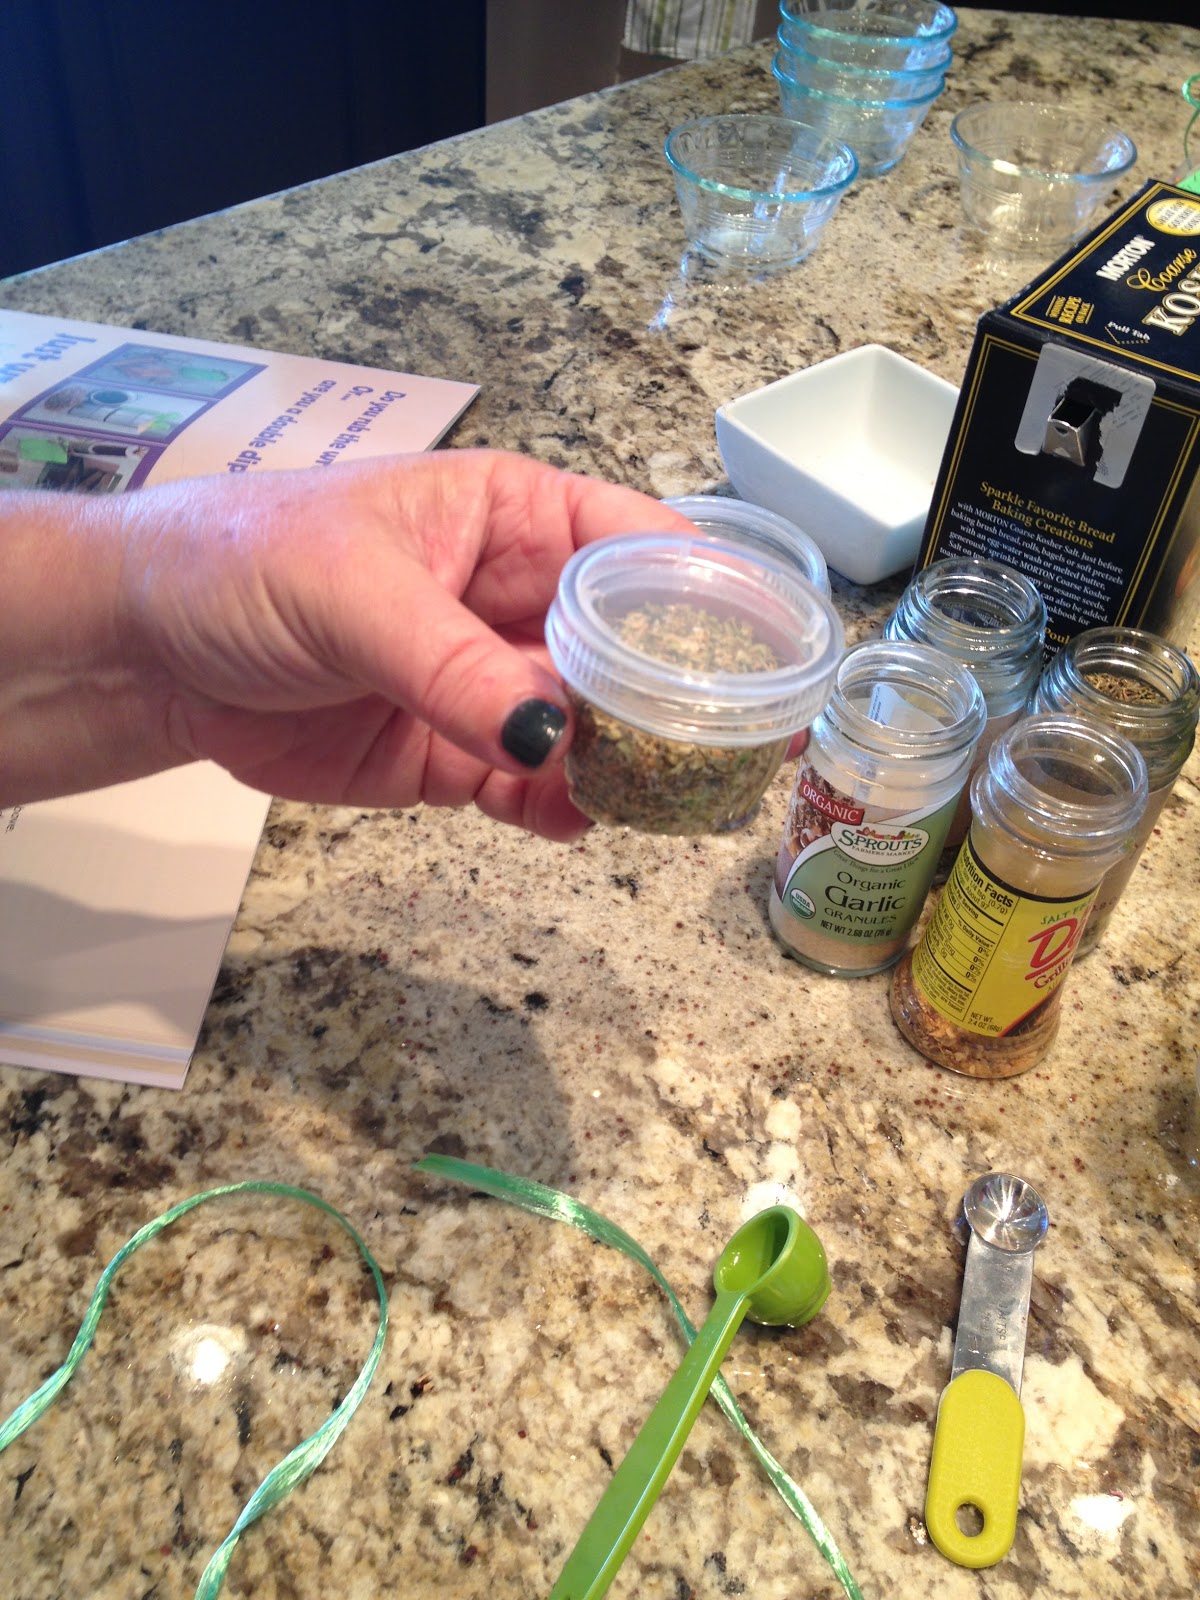
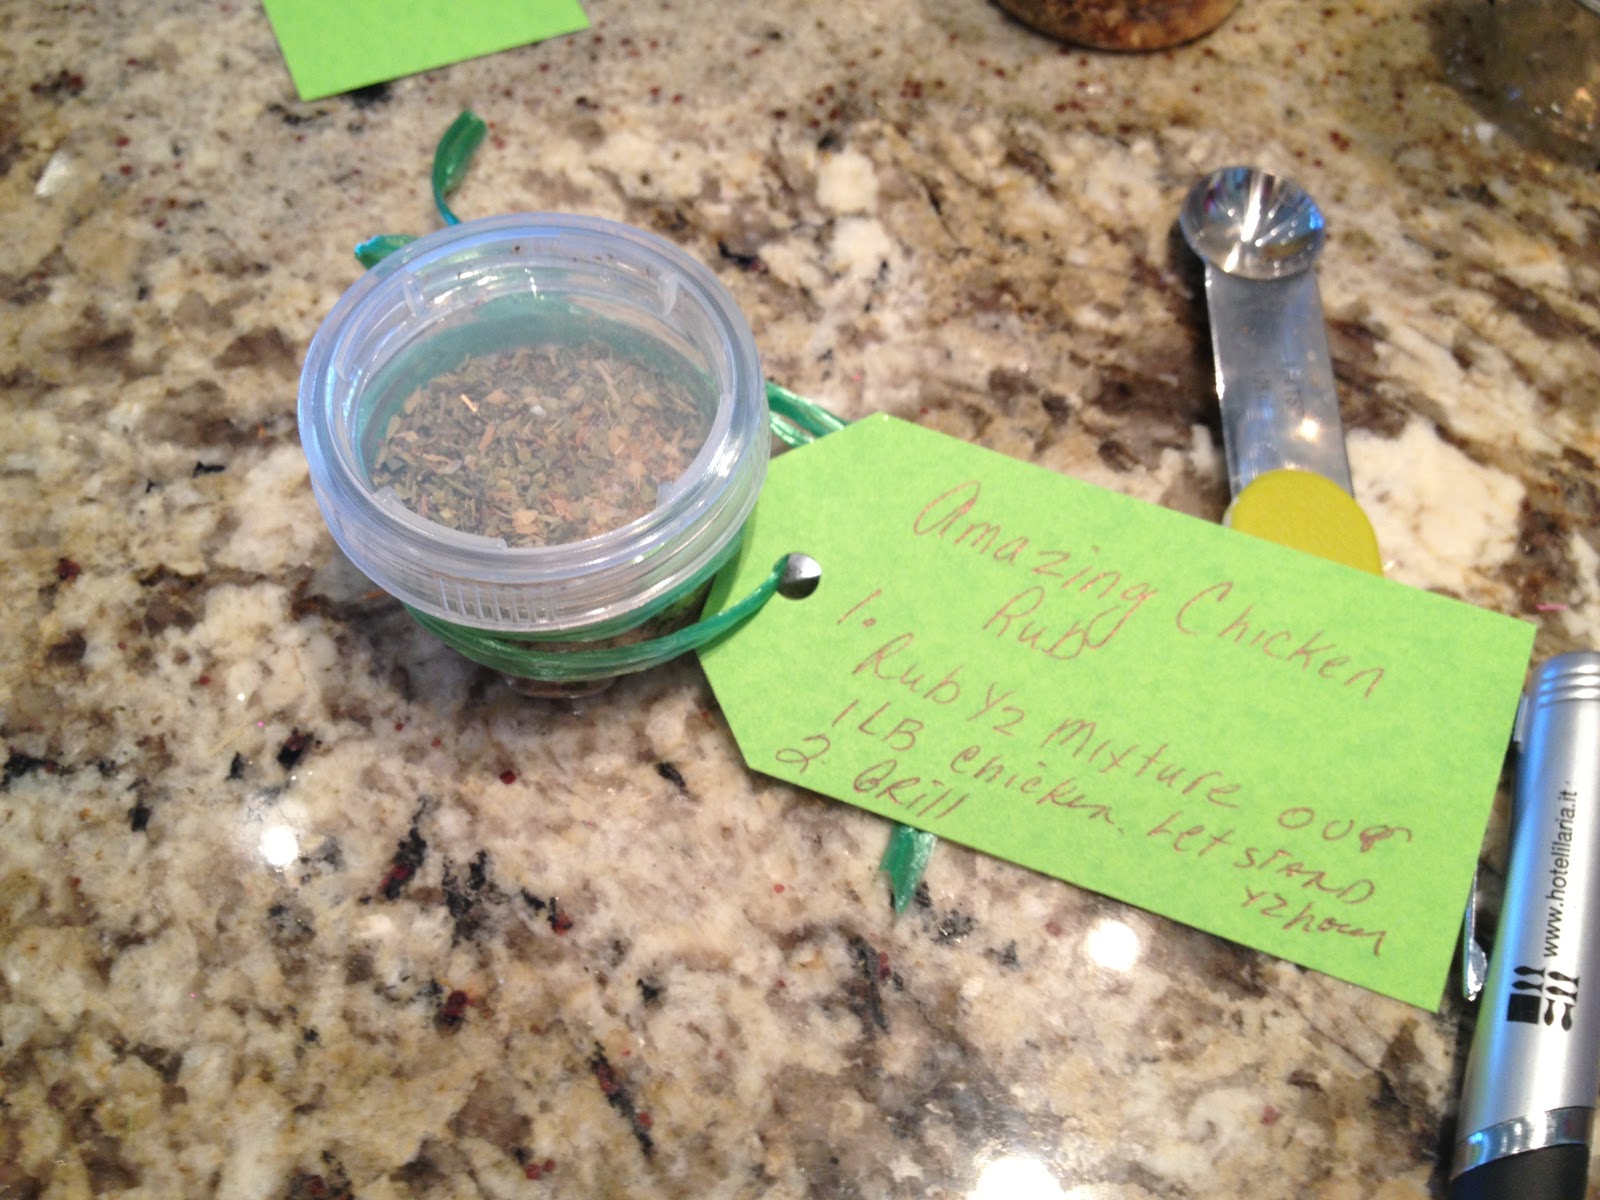
1. Rub ½ mixture over 1 lb. of meat and ensure both sides of meat are covered.
2. Place meat in a re-sealable bag, let stand 3-5 hours.
3. Grill as desired.
Enjoy this spicy rub love from:
(Your name here)________________________
4. Attach to your jar and give as a gift!
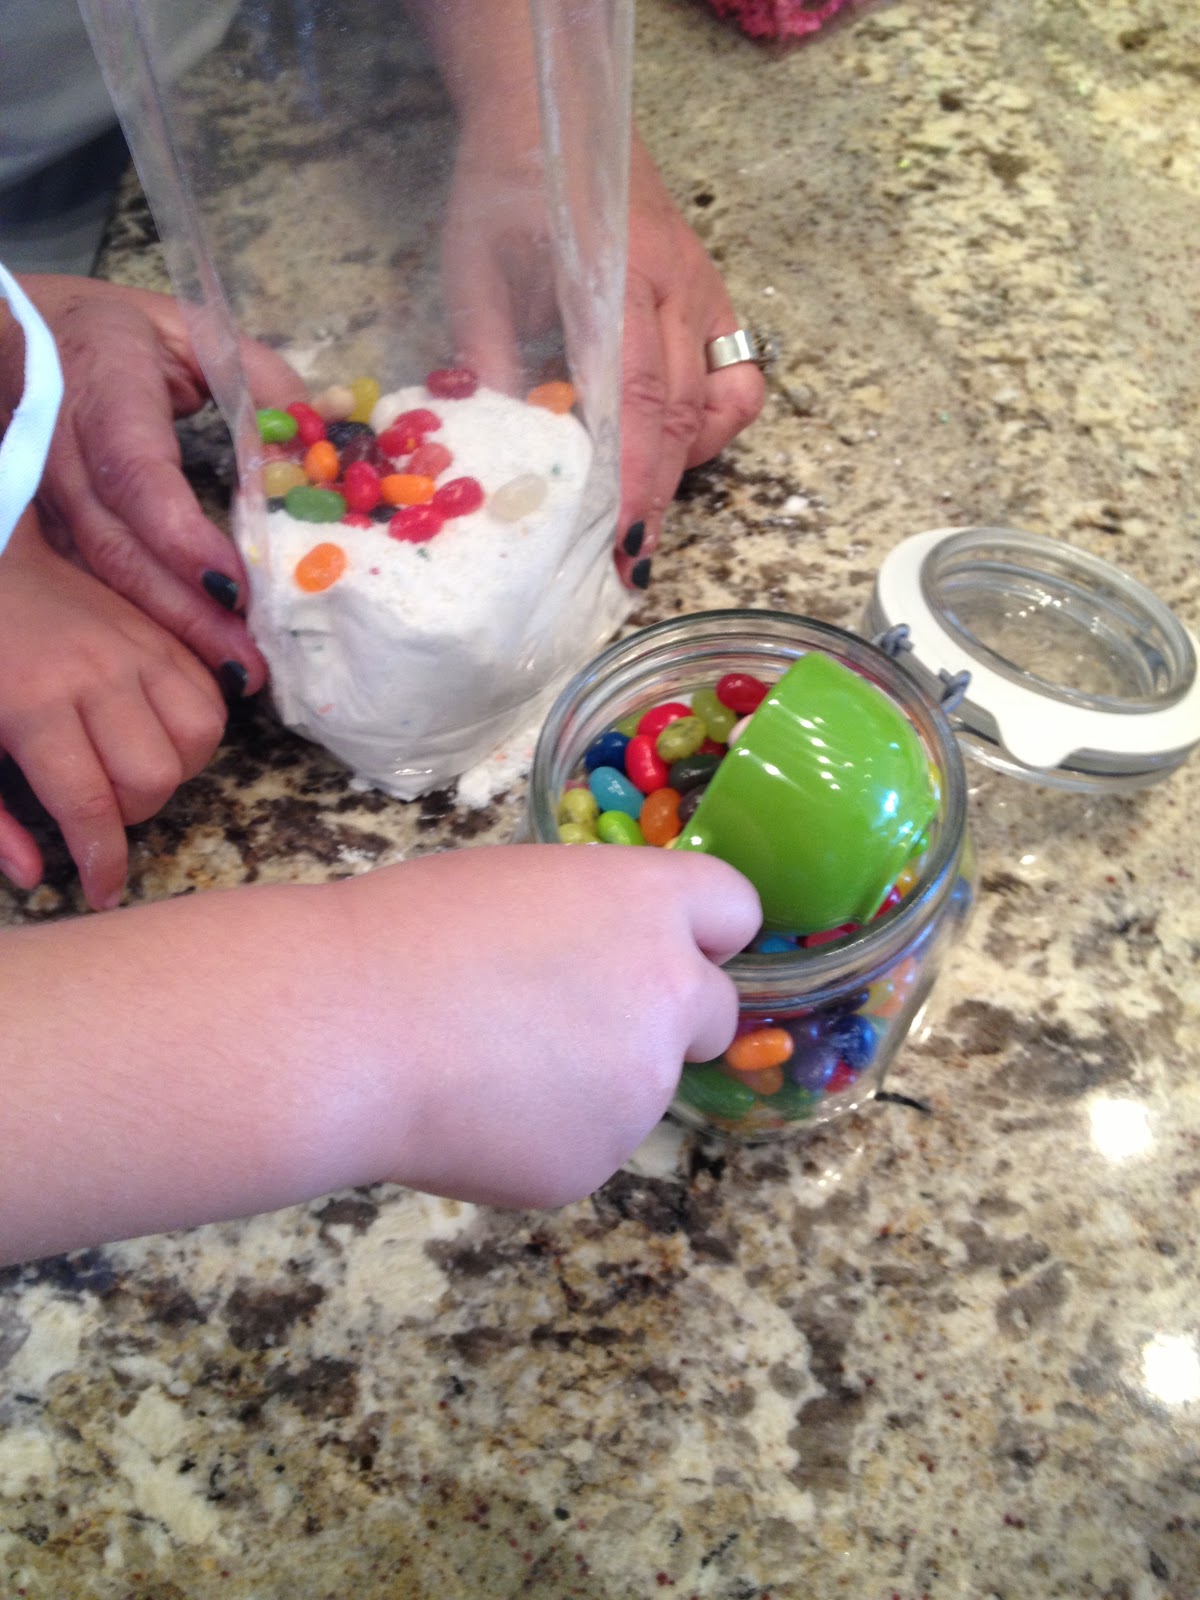
Jelly Bean Cookies!!!!
This week is "Just Wrap It" week where we're excited to bring you a taste of the sorts of recipes you'll find in Just Wrap It - D.I.Y. gift mixes from your kitchen. We'll give you directions on how to package the gift mix to give away for the holidays. You'll be giving the gift of a mix from your very own kitchen! So feel free to mix it up and add ingredients you like! All of the packaging you'll need for these gifts can be found at Creative Packaging!Here's our recipe for Jelly Bean Cookies! Great gift/recipe to do with your little ones!


4. Tie a ribbon in a bow around the twisted plastic.

1. Empty this mix into a medium mixing bowl. Mix well.
2. Add 4 tbsp of vegetable oil and 2 eggs. Mix well until cake batter is not lumpy.
3. Drop cookies by tablespoon 2 inches apart on a greased cookie sheet.
4. Bake at 350 degrees for 12-14 minutes until golden brown.
5. Cool 3 to 5 minutes on a baking sheet. Cookies will firm when cooled.
(Your Name Here)_________________________
Makes 2 dozen cookies.
6. Attach the tag to your package and give as a gift!
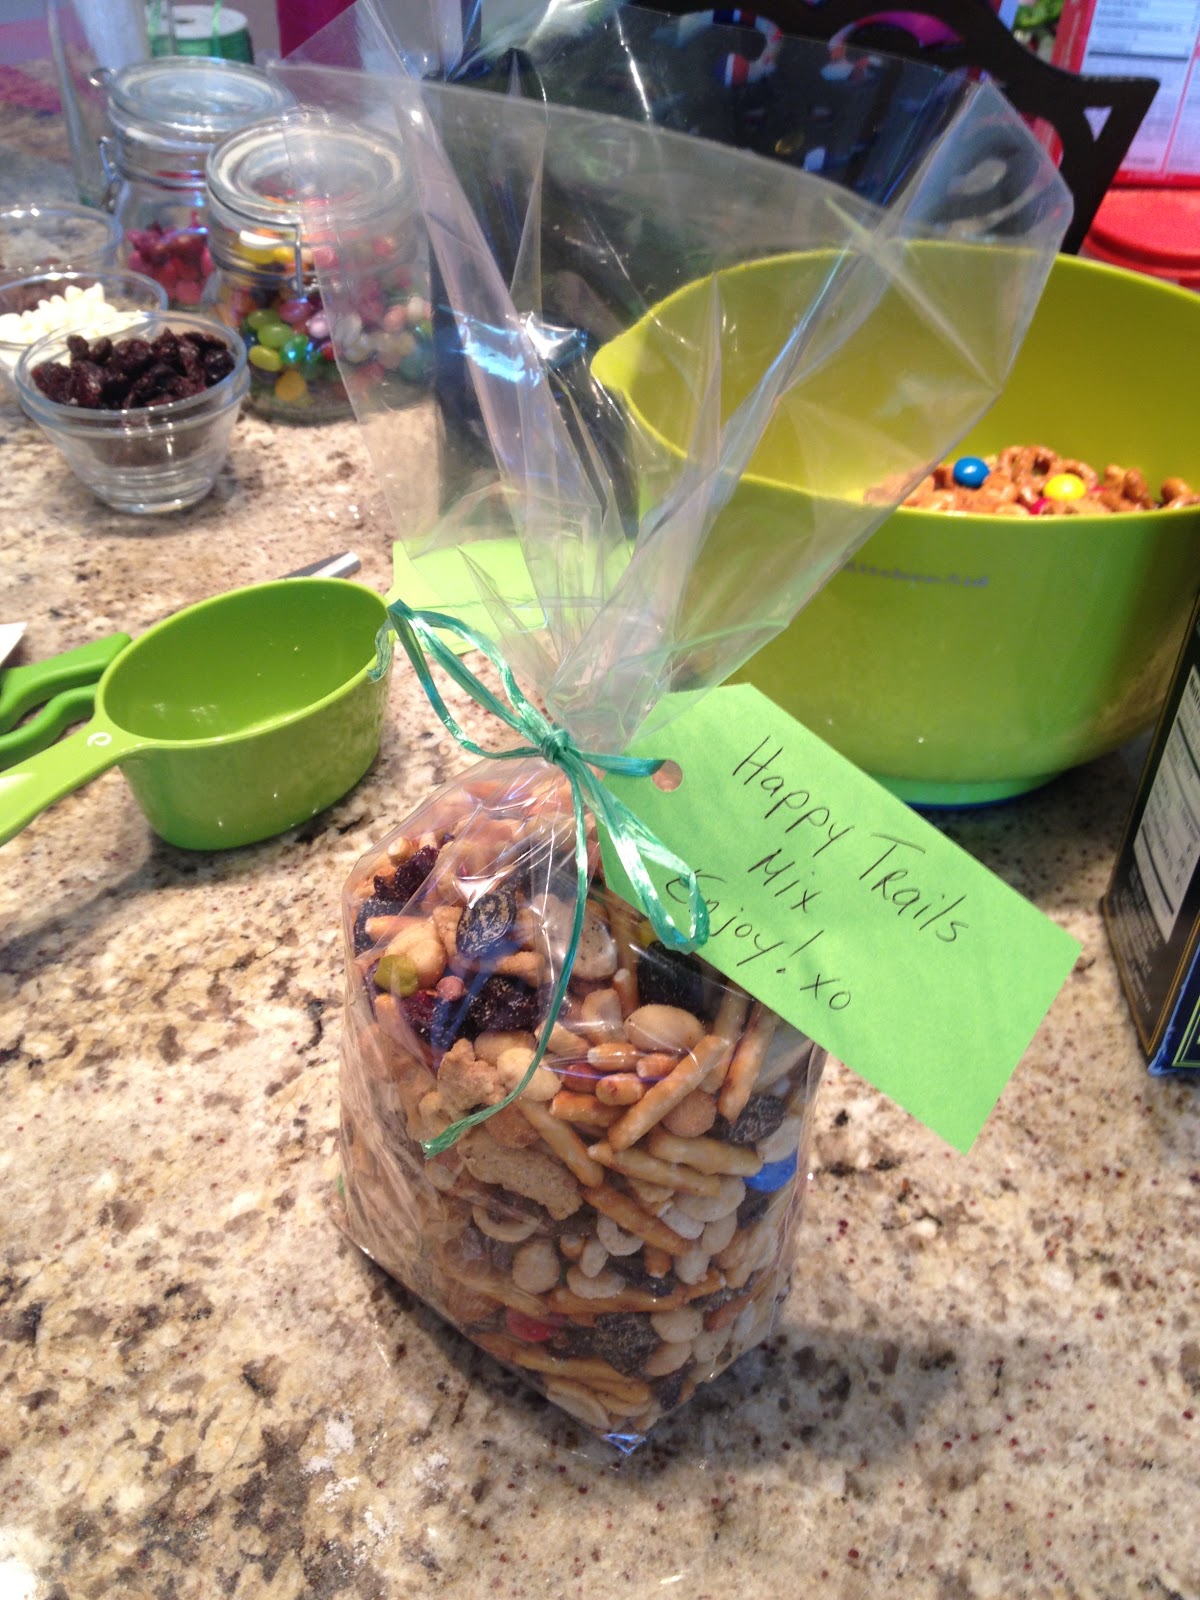
DIY Gifts from the kitchen
This week is "Just Wrap It" week where we're excited to bring you a taste of the sorts of recipes you'll find in Just Wrap It - D.I.Y. gift mixes from your kitchen. We'll give you directions on how to package the gift mix to give away for the holidays. You'll be giving the gift of a mix from your very own kitchen! So feel free to mix it up and add ingredients you like! All of the packaging you'll need for these gifts can be found at Creative Packaging!Here's our Happy Trails Mix!


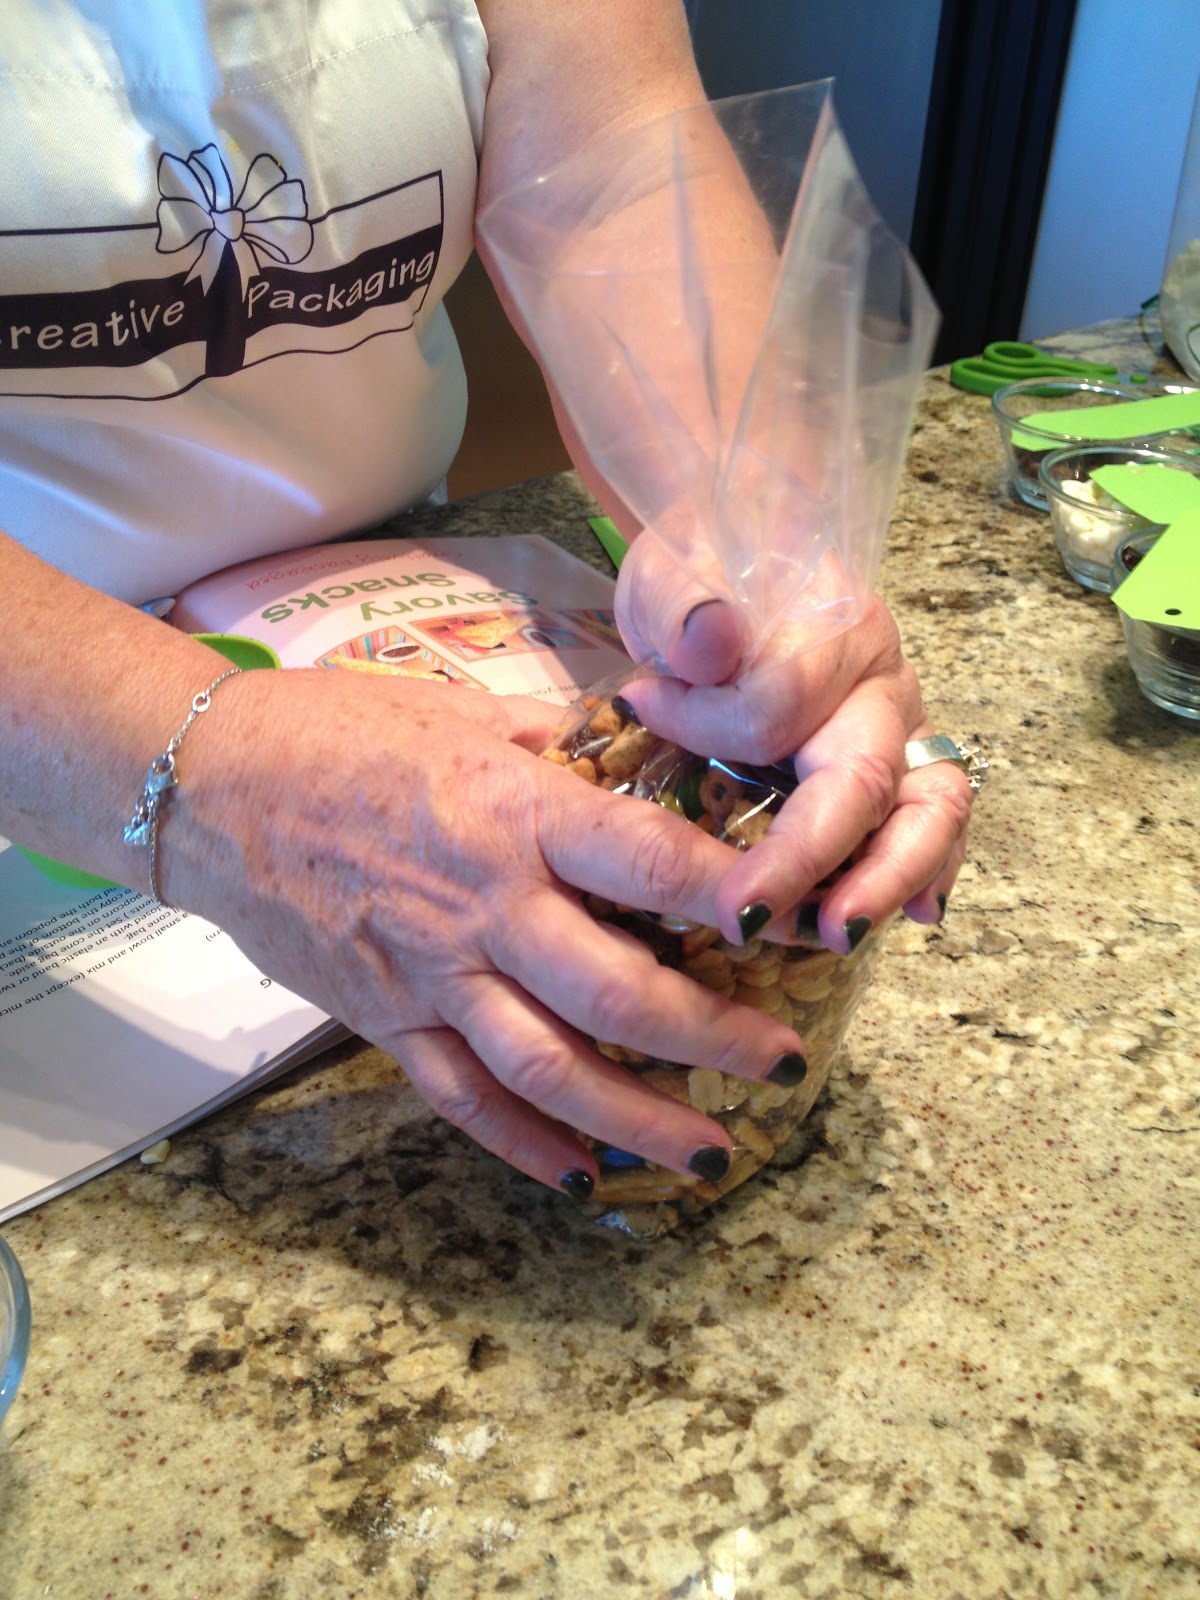

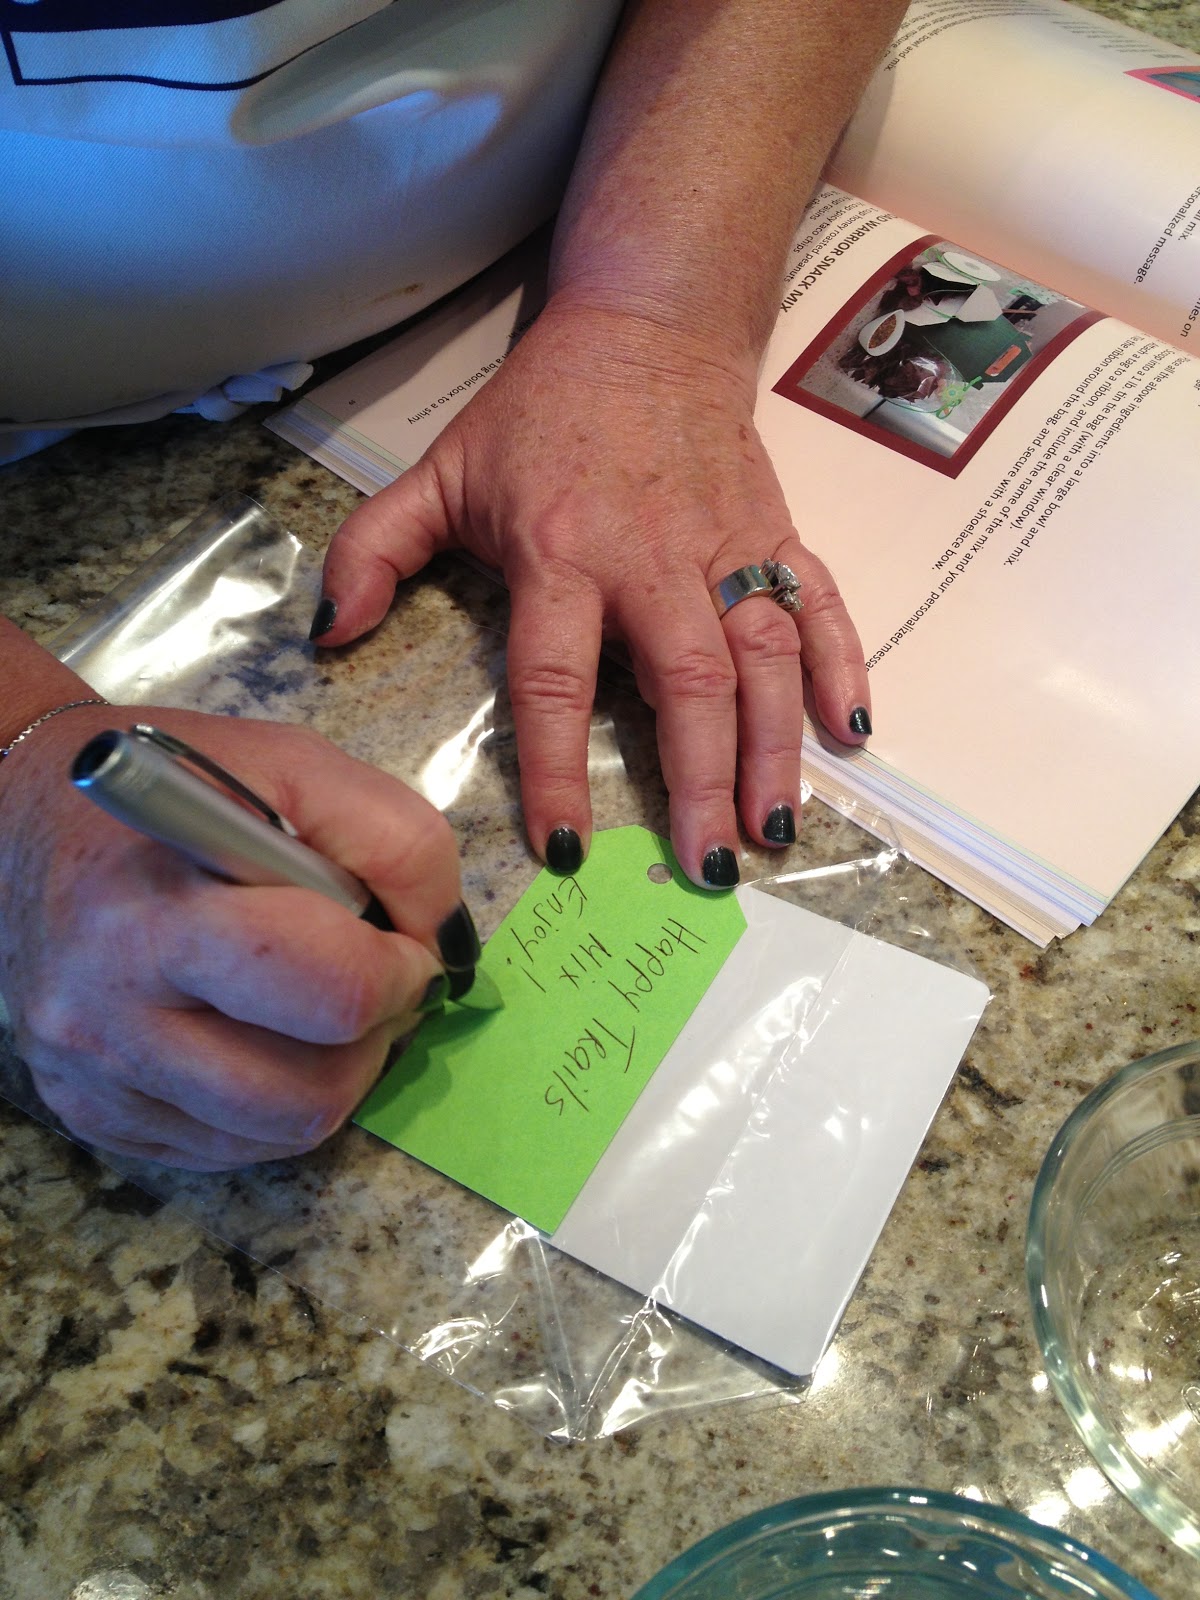
6. Attach your tag to the ribbon on your bag.
DIY Christmas Wreath

Tis the season for holiday shopping. I thought it was time to update my wreath on my door, so off to the mall I went. After the 4th store I went into and saw the really expensive door wreath I decided a) I can make this myself and b) I can do this for way less than the ones I saw at the store. Plus lets be real I love a fun DIY project, this took me a few hours and I loved the way it turned out so much I made two.
Materials Used:
- Wreath used is a 28”.
- Ribbon used is 35 ft. or ½ roll of Mesh Ribbon
- I used apple picks but you can use any of our cute picks.
Directions:
- Wind 4” mesh ribbon around wreath connecting the ribbon on the wire branches every 6 Inches, while you loop the ribbon around the wreath.
- Place 12 apple picks or 12 of any other decoration you wish around the wreath and fluff until you are happy.


Enter to WIN
It's OK if you're not ready because Creative Packaging is here to help you.
Come into any of our convenient store locations and show the staff that
you have liked us on Facebook or followed us on instagram and you will be
entered to win your choice of 25 medium sized holidays gifts wrapped
professionally by us OR $50 in holiday merchandise.
Drawing will take place
on December 15th.
Are you ready for the festive season?
Creative Packaging Christmas giftwrap give away OFFICIAL Rules
ELIGIBILITY: The contest is open to legal residents of Canada that are eighteen (18) years of age or older as of the date of entry. Void where prohibited or restricted by law. All federal, provincial, and local laws and regulations apply.
HOW TO ENTER: Participants may enter the draw by coming into Creative Packaging’s stores and show the staff that you “like” our facebook and/or following us on instagram . Entry information will be used solely for contacting winners for this particular give away. Enter as often as you like. To be eligible for the drawing, all entries must be received by 11:59 P.M. (PST) on December 15, 2014.
PRIZES: One (1) winner will be selected to receive a grand prize consisting of a choice between 25 medium sized gifts being wrapped or $50 worth of holiday themed merchandise. No alternative prize or other substitution is permitted. Prize is non-transferable. All federal, provincial and/or local taxes are the responsibility of the winner. Winner is also responsible for internet access fees and service charges.
SELECTION OF WINNER: The winner will be determined by random drawing of all eligible entries received by December 15, 2014. The drawing will be conducted by Creative Packaging on December 15th 2014 at 100-1580 Brigantine dr. The odds of winning a prize are based on the number of eligible entries received. The selected entrant will be notified by facebook or twitter by December 16th 2014 . The items may be shipped within Canada, but the costs of shipping are at the responsibility of the winner, and not the responsibility of Creative Packaging. The selected entrant will have15 days from notification to accept the prize by replying to a notification. Creative Packaging is not responsible for late, lost, misdirected, or unsuccessful efforts to notify the winner. All taxes on prizes, including income taxes, and any incidental expenses associated with collection of a prize are the responsibility of the winner. The winner assumes all liability for any damages caused or claimed to be caused by participation or by any prize and releases Creative Packaging from any such liability. If the selected winner cannot be contacted, is ineligible, fails to claim a prize, or fails to timely return the completed and executed declaration and releases as required, the prize may be forfeited and an alternative winner selected. By accepting the prize the winner agrees to the use of the winner’s name, voice or likeness for the purpose of trade, advertising, or promotion without further compensation, unless prohibited by law.
GENERAL TERMS AND CONDITIONS: Conduct of Sweepstakes and selection of the winner are in Creative Packaging sole discretion, and Creative’s decisions are final and binding. Employees of Creative, their affiliates, subsidiaries, advertising, promotion and fulfillment agencies, and legal advisors are not responsible for and shall not be liable for: (i) late, lost, delayed, damaged, misdirected, incomplete, illegible, unintelligible, or postage-due entries; (ii) any condition caused by events beyond the control of Creatives that may cause the Give away to be disrupted or corrupted; (iii) any printing or typographical errors in any materials associated with the Give a way; (iv) any injuries, losses, or damages of any kind arising in connection with or as a result of the prize, or acceptance, possession, or use of the prize, or from participation in the Give away By participating, each entrant agrees to release and hold Creative and the employees, officers, directors, shareholders, agents, representatives of Creative Packaging, their affiliates, subsidiaries, advertising, promotion, and fulfillment agencies, and legal advisors, harmless from any and all losses, damages, rights, claims and actions of any kind in connection with the give away or resulting from entrant's participation, acceptance, possession, or use of any prize, including without limitation, personal injury, death, and property damage, and claims based on publicity rights, defamation, or invasion of privacy.
WINNER’S LIST: For a complete list of winners, send a separate, stamped, self-addressed business-sized envelope to Creative Packaging, 100 – 1580 Brigantine Drive, Coquitlam, BC V3K 7C1 Canada.
View full article →DIY Cupcake gifts
With the Holidays around the corner I am on the hunt for easy DIYs to give as gifts. I have been obsessed with Soda pop cupcakes (directions on the blog) I have made the cupcakes a TON lately and every time people have asked for my recipe. So finally it clicked, what a perfect DIY that is less than a dollar and super cute.

First the supplies needed:
Boxed cake mix
Cans of pop
Tags http://www.creativepackaging.ca/collections/accessories-specialty-items?page=5
Ribbon http://www.creativepackaging.ca/collections/ribbon
Cardboard bottom bags in 2 sizes I used 4x8 and 6x12 http://www.creativepackaging.ca/collections/confectionary-bags
Directions:
 1.Measure 1/2 of the boxed cake mix into the smaller cardboard bottom bag.
 2. Tie it up
 3. Put a can of soda and the cake mix in the larger cardboard bottom bag.
 4. Add the directions on the tag (I just 1/2 the directions from our blog http://www.creativepackaging.ca/blogs/creative-crafts) tie with a ribbon and tada!!!
I used 1/2 the box so it goes twice as far, you can also add topping or filling for your cupcakes and get as fancy as you want. I wanted to keep it simple and keep my cost down. I hope you make and love the cupcakes as much as I do.
Soda Pop Cupcakes
- 1 box cake mix, any flavor (I have also done this with gluten free mix)
- 1 can (12 oz) of room temperature soda, any flavor
- Preheat your oven to 350°
- Line muffin pan with liners.
- In a medium bowl combine your pop and cake mix, stirring with a whisk until most of the lumps are gone.
- Fill each liner 1/2 full of batter.
- Bake for 18-20 minutes until cupcakes are springy and toothpicks comes out clean.
- Let cool completely before frosting.

Creative Packaging, A113-2099 Lougheed Highway, Port Coquitlam, BC V3B 1A8
© 2025 Creative Packaging (Canada)

